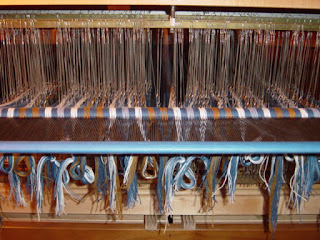
Okay Warping Back to Front Finally

Alrighty. I'm ready. Not only did I decide that warping back to front is the way to go but, I remembered to take pictures of the whole process to document. I encourage everyone out there who warps front to back to take a step out of the box and give this a try. I cut an hour and a half (and that's not even counting beaming!!!) off of my loom dressing time!!! Imagine that!!!
I am by no way claiming to have it all down pat as each of us has our own variations but, if you do see where I can improve.......please, I beg of you, let me know;) Here is my experience:
Step 1) Count out ends with a cross at only one end. Attach the ends to the back beam. If you have not yet done this before, simply remove the apron rod which you attach the warp and put it through the ends. Be careful to include the first and last thread on the apron rod so that they hold. Next attach the apron rod onto the apron. This step is a little easier if you have one apron rod already attached to the apron and tie on the second apron rod onto it. Slide the lease sticks through the cross and tie them together on each side about an inch apart.

Step 2) Tie the raddle onto the back beam and attach the lease sticks to the loom so they remain stationary. In this case they were suspended from the castle to the back beam. To prevent the threads from becoming tangled in the raddle place a folded piece of cardboard or heavy paper over the nails. Place the number of ends per inch in each space between the nails on the raddle. Ex:24 epi = 24 ends in each space between the nails. To prevent the threads from coming out of the raddle, place a rubber band over the nails. Bring the warp chains through to the front of the loom, through the harnesses (not the heddles) and over the front beam

Step 3) Wind the warp onto the back beam for about a yard. Go to the front of the loom and tug evenly on each chain warp then beam another yard. Repeat the process until there is about a yard to two feet left in front of the heddles.
Step 4) Untie the lease sticks and retie them to the castle, if one is available, so that they are on top of each other yet separated by about an inch. Remove the raddle being careful not to snag any of the threads.
Step 5) Raise the harnesses, if necessary, and suspend them using books or blocks. Position yourself comfortably in front of the loom, sitting if possible, and start threading the heddles. At this point the dressing process will be similar to threading front to back as you are simply threading the heddles. Tie them in bunches at each inch.

Step 6) Remove lease sticks and bring them through the harnesses so that they are resting on the front and back beams. You will be able, at this point, to rest the reed on them to draw through the ends. Center the reed and measure the distance to the starting point at draw through the ends. In this case the project is 24 epi with a 12 dent reed so, 2 ends per dent will be drawn through. Each inch is untied, drawn through the reed then retied.
Step 7) Place the reed back in the hand tree and secure. Tie the ends to the front apron rod. Viola!!!
If you have any questions or if any of these instructions are unclear, please contact me. We are planning on video tutorials early next year. Some of these will include continental knitting, warping back to front, and much more:)

Comments

skiingweaver said…
I'm a devotee of front to back warping (really like to be able to move yarn around once I can see it on the loom) - but I'll have to give back to front another try next time I'm making something where I won't be playing with the color sequence! That's a huge time savings...

Popular posts from this blog

Damask....Ah Ha Moment....Now Taquete?

Ok . So since the weather has been changing, I now have some more obvious time to 'play' with some designs that I have stored in my head:) Damask, in particular, has been a favorite of mine to look at and I really feel the urge to use my loom to create tapestry like scarves and shawls. I don't want anything too heavy as I really like the feel of tencel , bamboo, and I would eventually like to switch to silk for my finer works. I am still in the learning stage though and I hope to always remain in the learning stage. The damask pattern that I have been toying with, I like but, I lose a lot of detail the more I stretched it out. I was a little frustrated but, certain that there was something that I could do. The picture above is a little small but, the piece all the way to the right is a 4 point twill threading, the middle is a 5 point twill threading, and the one on the far left is a 6 point twill threading. To get a true satin/sateen I would have to use the one on the far

A New Loom!

       I’ve been weaving on a Glimakra 8 harness countermarche loom for almost 10 years now.  I love it!  It weaves like a dream, it’s super heavy, I get an excellent shed when all is going well, and I have a bit of an emotional attachment to it.  The only thing that I don’t love about this loom is that I have to climb on the floor to tie up the treadles.  Depending on the pattern, I could be under there for quite some time.  I’m pretty limber and in pretty good shape but climbing under the loom is back breaking work.  So much so that I’m sometimes out of commission for the remainder of the day after.  Look how pretty this loom is though!       I cleaned out the area that this loom has been designating as it’s home and prepped for the replacement.  I got an amazing deal on a Louet Spring and couldn’t pass it up!        I’ve been doing a lot of research on looms (well, really when am I not looking at looms!) and know that I love Louet.  My Megado has served me well for many years and th
        You know when you make something and the entire process just seems seamless?  Well, that’s how this project played out.  I have some 10/2 tencel that is natural and I dyed a bunch of it over the summer.  I wound off bouts of around 1700 yards each and now know that I would like to make larger skeins so that I can get a couple of scarves using this pattern again...just a bit longer.       This picture was taken in natural sunlight of the braid after counting the ends on the warping board.  Let’s get this thing on the loom!                  I learned a new trick for spreading the warp in the raddle.  Since this is an A B color pattern, it’s important to not separate the colors in the raddle.  To never “separate the twins” makes beaming the warp a piece of cake!   Another cool trick I learned was to put the warp under tension while beaming.  With a stack of my son’s graphic novels, I had the full six yards beamed in seven minutes!  SEVEN!!! My absolute favorite part, threading